She was gorgeous at the begining anyways. At the end she just looked like every other women in any fashion magazine at your local Walgreens. They all look fake and have no personality; they have no uniqueness to them.
Contemporary=Innovation? contemporary+Innovation=? contemporary+?=Innovation?
星期五
Dove Photoshop Effect
She was gorgeous at the begining anyways. At the end she just looked like every other women in any fashion magazine at your local Walgreens. They all look fake and have no personality; they have no uniqueness to them.
星期三
Tourist Guy
星期四
Eloge du négatif » au Petit Palais
Par Christophe | 18 Février 2010 à 10:00 | Tags : expo
Les débuts de la photographie sur papier en Italie, 1846-1862
Utilisé au XIXe par les photographes professionnels, les amateurs et les artistes, le négatif papier a permis à la photographie naissante de s'intégrer pleinement au monde de l'art.
Au cours des années 1840, le négatif papier devient un outil novateur et fascinant : il inaugure «l'ère de la reproductibilité» tout en créant un nouvel univers visuel. L'exposition explore ce temps fort méconnu de l'histoire de la photographie.
Provenant de prestigieuses collections italiennes et françaises, 140 œuvres, négatifs ou tirages d'époque, sont pour la première fois présentées.
Du paysage romantique à l'édition touristique en passant par le recueil pour artistes, le négatif papier permet la professionnalisation des photographes et la naissance de grandes entreprises éditoriales modernes. Dans cette aventure, photographes italiens (Giacomo Caneva, Vero Veraci, Luigi Sacchi etc), français (Eugène Piot, Frédéric Flachéron, Edouard Delesseretc) et anglais (George Wilson Bridges, Calvert Jones, James Graham) collaborent étroitement.
Bien loin de la précision ou du réalisme photographique auxquels est habituellement associée la photographie, ces œuvres sont des témoignages subjectifs et intimes de la sensibilité d'une époque. Elles exigent de nous une véritable conversion du regard.
« Eloge du négatif », du 18 février au 2 mai 2010. Musée des Beaux-Arts, Petit Palais, avenue Winston Churchill, Paris 8e.
Négatif ci-dessus : Gustave de Beaucorps, Rome – San Pietro in Vincoli, Négatif papier © Collection privée, Lugano
How To Make Your Photo Look Like Lomo Photo
From the first time I saw a photo that looked like this, I wanted to shoot one of my own. But, for the longest time I couldn’t figure it out how people took photos look like this. Then one day searching the web, I realized I needed a Lomo LC-A camera. This is a Russian made camera that was a knock off of another camera. It is poorly made and by Japanese camera standards, a bad picture taker too. As the legend goes, somewhere in the 1990’s a cult following developed and hasn’t stop since.
Low and behold I went out and bought 2 of these babies. I love them, but I also had a digital SLR – a Canon 20D. After shooting with the Lomo, I wanted to take photos from my 20D and give them the Lomo look and feel.
I searched and searched and after trying several different Photoshop methods, I finally came up with my own using a mix of different techniques. By all means, there are probably other ways to do this, but this method has served me well.
Get Free Weekly Digital Camera Tips via Email
Here is my step by step on how I take a digital photo and make it Lomoified. I do have one suggestion though, create an action script once get this down, it will save you a ton of time.
Getting Started – Creating a Vignette
The first thing you want to do is create the classic vignette that the Lomos are well known for and I achieve this by doing a freehand lasso of a circle around the photo. It doesn’t need to be perfect and to prevent hard edges, I set the feather to 80-90px before creating the circle.
google_protectAndRun("render_ads.js::google_render_ad", google_handleError, google_render_ad);
Once you have set the feather (shown above) and have drawn the circle, you must invert the selection. You can do this one of two ways. #1 Shift-Ctrl-I (Shift-cmd-I on the mac) or #2 Go to the menu Select>Inverse.
Now to achieve the vignette, I add a Levels layer. Note: I still have the invert selected.
This will add a masked out layer on top of your original layer. I then adjust the levels by moving the center arrow to the right. This will darken the edges, giving me a vignette. The amount is up to you and in this case I went from 1.00 to 0.50 on the center number highlighted in the image below.
Now you have a vignette.
On to making the photo look Lomo
Another key to a Lomo picture is the color contrast and saturation. This occurs because people with real Lomos use color slide film and cross-process the film in C41 chemicals.
For those that don’t know what cross-processing is, it’s when you develop film in a chemical other then what it was made for. Standard 35mm film is usually processed in C41 chemicals and Color Slide film is usually processed in E6 chemicals. Interesting results happen when you mix and match.
Typically, Lomo owners will take color slide film (E6) and have it processed as standard 35mm film (C41). This results in over saturation of colors and at times some freaky results. All of which make Lomo as special as they are.
To get a digital photo to look Lomo, we need to fake the cross-processing effect (E6 film in C41 chemicals).
At this point I usually flatten the image using shift-ctrl-e (shift-cmd-e on the mac) or go to the menu and Layer>Merge Layers.
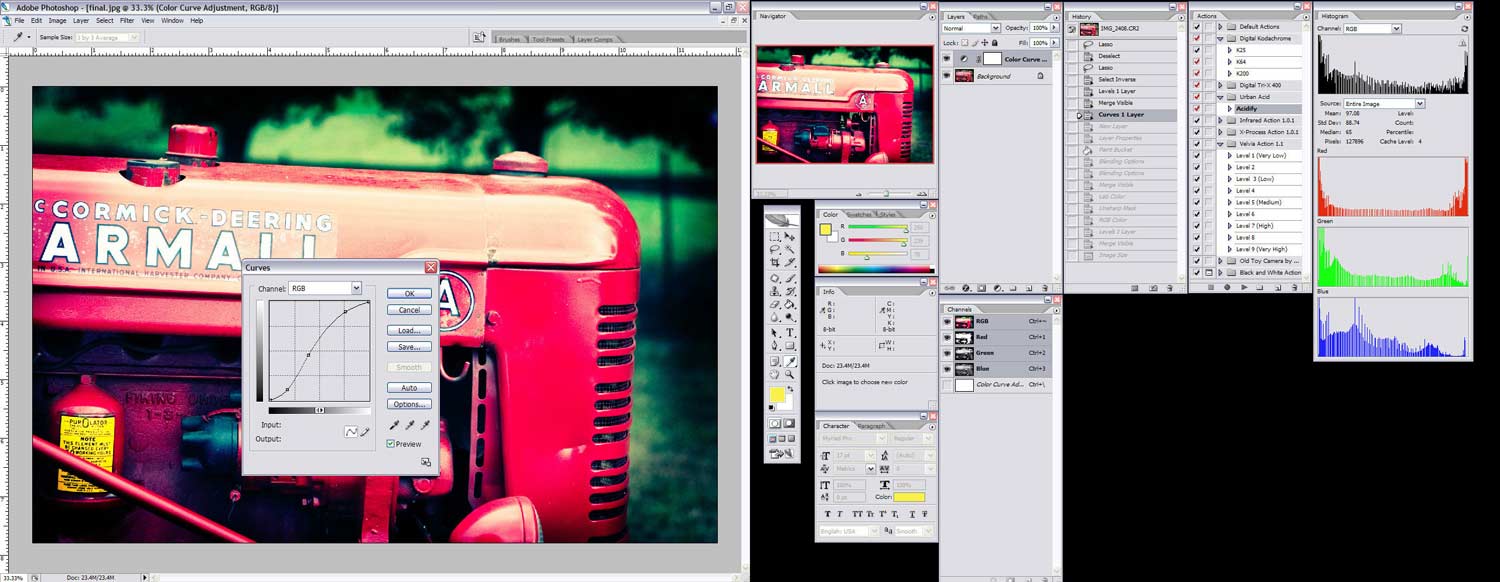
First, I add a curves layer and create a slanted S.
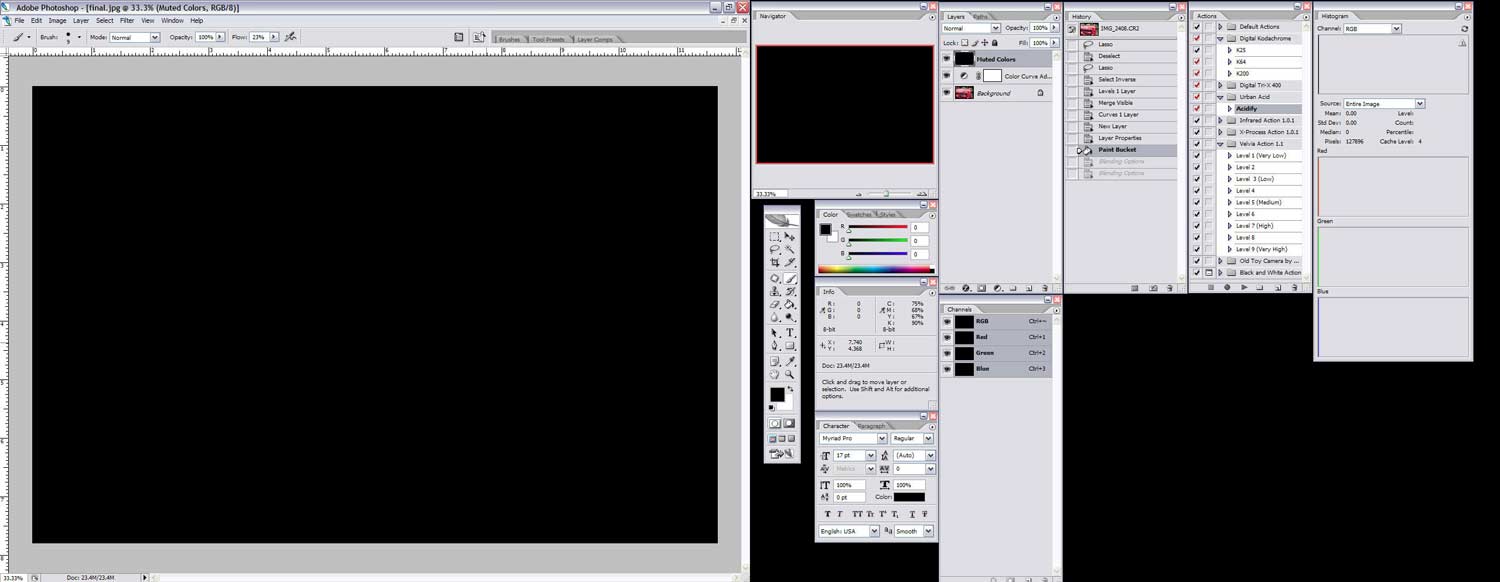
Then I create a new layer on top of the other two layers. I select the paint bucket and pick the color black and fill the new layer with solid black.
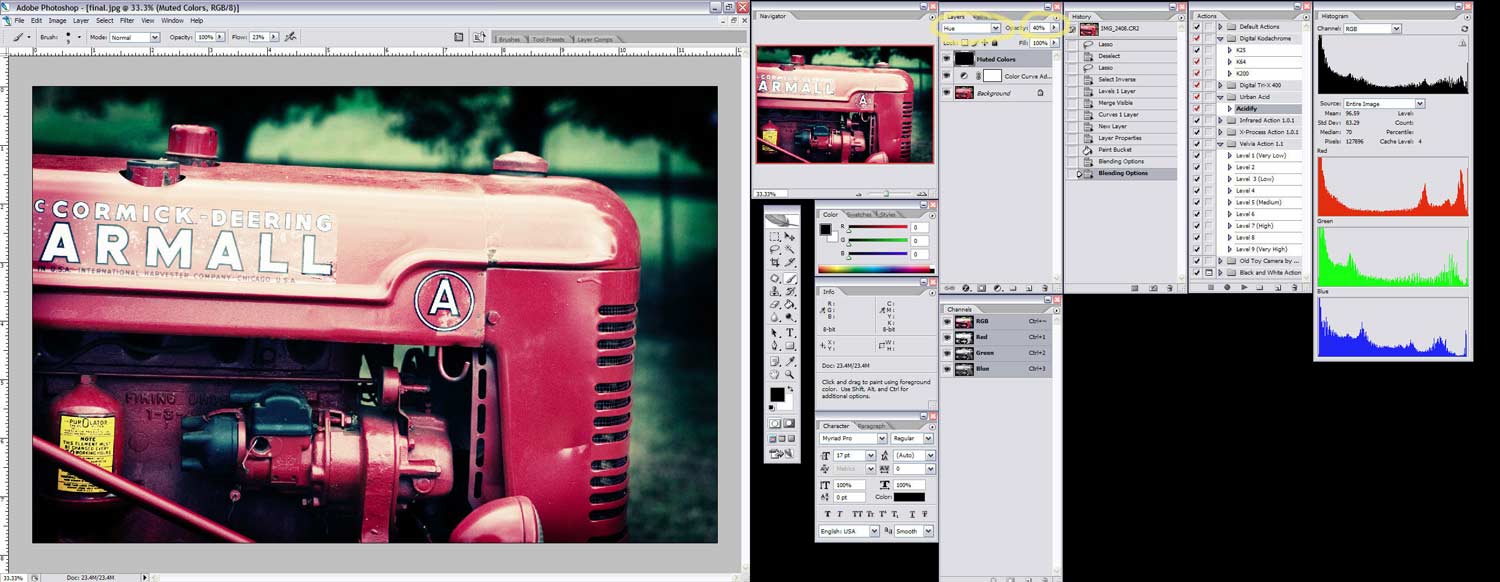
Then I change the blending mode and set it to Hue and reduce the opacity to 40%.
Sharpening and Saving
This has gotten us very close to be finished. Again, I flatten the photo by using shift-ctrl-e (shift-cmd-e on the mac) or go to the menu and Layer>Merge Layers.
Before saving the photo as a JPG, you need to sharpen the photo. I use the unsharp mask and Lab mode/lightness technique. The purpose of this step is that it adds more contrast and darkens some of the areas as well. Now you can use whatever sharpening technique you want, but the following method prevents the color halos that come with certain sharpening techniques.
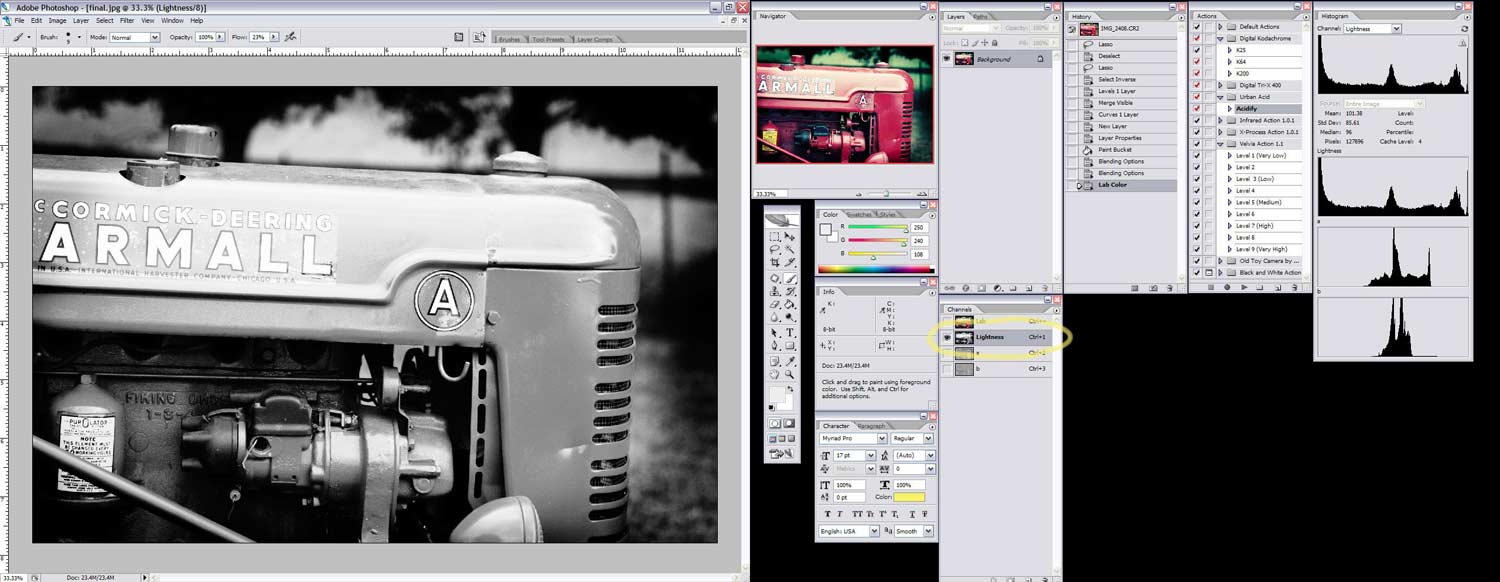
Go to Image>Mode>Lab Color. If you hadn’t flattened the image yet, it will ask you if want to flatten, please do so.
Then select your channel window and click on the lightness channel. The 3 other channels should deselect.
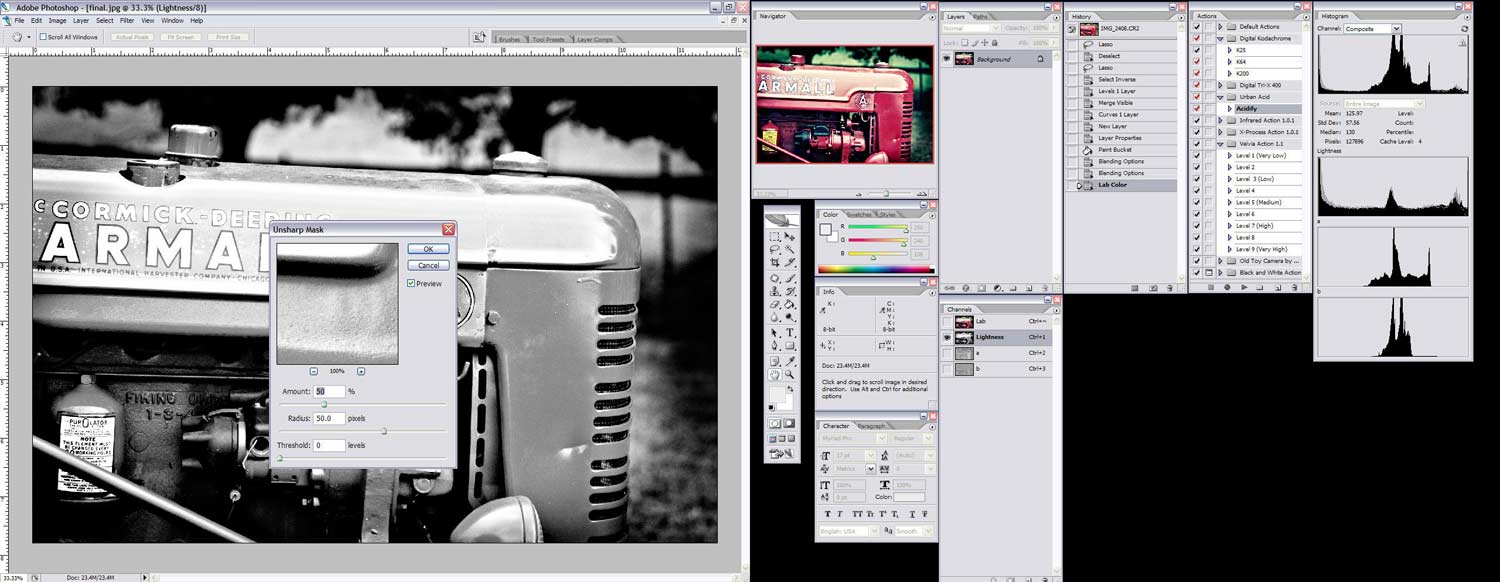
Then go to the menu, select Filter>Sharpen>Unsharp Mask.
I like sharpness, so I set the Amount to 50%, Radius to 50% and the Threshold to 0. Click Ok. This is completely up to you on the settings. Plus it will depend on the photo as well and use your best judgment/preference.
Go to Image>Mode> RGB Color. You do not have to reselect the unchecked channels, when converting back to RGB, the channels will automatically turn back on and the photo will go back to be in color.
Now you are done, save the file and share.
Final step, save as a Jpeg.
Before the Lomo Photography Look
After the Lomo Photography Look
Read more: http://digital-photography-school.com/how-to-make-digital-photos-look-like-lomo-photography#ixzz0h8ZeQ3Bv
Prepare Yourself: How Girls Become Popular On Internet.
Just For Fun! Famous "Beauty" Yufeng Luo!


The Introduction And Overview for Photoshop
Optimizing Photoshop — Introduction and Overview
See also: Optimizing Adobe Lightroom.
This study answers real-world questions for optimizing Adobe Photoshop CS3/CS4:
- How much memory?
- Which model/brand of hard disk?
- Do I need RAID?
- How do I configure Photoshop for best performance?
These questions are answered definitively for the Mac Pro and MacBook Pro. The performance gains for working with large files are as much as 5X, making the choice of system configuration critical to productive work with Photoshop.
This study is not about how fast Photoshop can execute Unsharp Mask or Gaussian Blur or various filters; those operations are functions of the CPU speed and memory bandwidth; it’s a simple choice: buy the fastest (GHz) CPU with a premium video card, should you determine that CPU speed is your primary impediment.
When the file(s) fit into memory, performance is governed exclusively by CPU clock speed along with on-chip cache and number of cores, and main memory bandwidth (and also your operating system and/or other programs running at the same time). See Multi-core Computers and Apple Mac Pro and All About Mac Pro Memory to understand these issues better.
Don’t have time to read all the details? Cut straight to the conclusions, but do not miss the important Photoshop configuration information.
When the scratch disk gets involved, CPU speed has little or no influence on performance, because the CPU will be waiting for data much of the time. In this situation, ample memory and fast hard disks exert far more influence on overall processing time. The remainder of this discussion is what happens when Photoshop does not have enough memory eg when working with very large files (many megapixel and/or many layers).
When Photoshop uses a scratch disk
The Photoshop “scratch” volume comes into play when Photoshop utilizes as much memory as it can, but still cannot hold all its working data in memory. Then Photoshop must “swap” data to and from the hard disk, a far slower proposition than manipulating it in main memory. See Verifying your memory requirements.
When the scratch disk gets used, testing shows that it’s essential to use the BiggerTiles plugin in conjunction with DisableScratchCompress plugin. See the Configuration page for details.
For users with moderate size files (a single file of up to 500MB or so), the scratch volume is used sparingly, provided that the system as as a whole has adequate RAM (eg 8GB on a Mac Pro). But when you open several files of that size, use a long history or cache levels, add many layers, etc, then the scratch disk will start to be used significantly. Figure a least 3X the memory for a file eg 1.5GB memory for a 500MB file.
A fast Photoshop scratch disk is fast mainly because of transfer rate, which means creating a striped RAID for optimal results. Please see the RAID page for details on creating a striped RAID.
Some users will never experience the need for a scratch disk; don’t bother with this stuff unless Photoshop starts using it (noisy disk as the drive seeks, very slow operation, low “efficiency” in the Photoshop status readout).
Configuring Photoshop performance preferences
Please see the Configuring Photoshop page.
Viewing efficiency, memory, scratch size
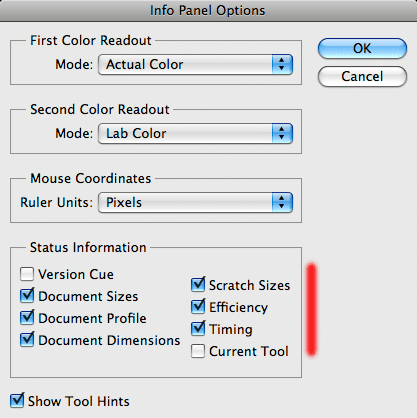
You can check how much real memory a program is using with Apple’s Activity Monitor HOW.An Efficiency of 100% is the goal(see the Info panel below). If efficiency is at or near 100%, then only a faster computer will improve performance eg 3.2GHz instead of 2.8GHz.
Show Photoshop’s Info panel, and configure it using Panel Options. The Doc, Scratch and Efficiencyreadouts will help you determine what’s going on.
Note that Efficiency does not capture the efficiency of an entire script or action, only the last operation. This makes it useless for getting an overall picture of efficiency when pruning an action or script. Use a watch or clock to get the actual elapsed time of a long running operation.
Also, note that the values shown are prone to inaccuracy when the history palette is used to back up and go forward (a bug). Finally, the Info panel can be slow to update, sometimes taking 10 seconds or more to show current values after a big operation (another bug—it should say “calculating...”).
What about a RAM disk?
See Using a RAM disk for Photoshop scratch*.
* “scratch” is what you need when contemplating the CS4 upgrade price!
What about a solid state disk (SSD)?
Please see What about a solid state drive? for an overview of solid state disks (SSDs). SSDs are preferable to STDs!
Unless you’re considering a server-grade SSD, a striped RAID offers far higher transfer rates at far lower cost and far higher capacity. See the test results with the Intel X25-M SSD.
Task Time is Disk or CPU limited
Both disk and CPU speed influence the total time for an operation to run. Reading and writing data takes time, and “crunching” it (computing) also takes time. It is the relative proportions that matter; we say that a task is CPU-bound when its time to execute is dominated by the CPU (processor) speed. We say it is IO-bound when its time to execute is dominated by the time to read and/or write date (eg “I/O” or input/output).
You can spy on what is happening by using Apple’s Activity Monitor HOW.
There can be overlap between disk I/O and computing, in fact there can be complete overlapmeaning that a faster CPU won’t help at all—100% of the time is spent doing I/O, even if the CPU is quite busy simultaneously. Unfortunately, this does not appear to be the case with Photoshop.
When Photoshop is using the scratch disk heavily, it is IO-bound. A fast scratch disk can cut the total time down dramatically. Without the scratch disk, Photoshop is generally CPU-bound (perhaps poorly utilizing the available CPU cores, but CPU-bound nonetheless). For example, opening and saving files can be CPU-bound because Photoshop uses only a single CPU core (“single threaded”).
Determining Photoshop memory requirements PERMALINK
Get an accurate idea of how much memory is required, and how large a scratch volume to use.
Step 1 — determine your total scratch file size
Determine the largest scratch file size that Photoshop uses for your work. If you work with more than one file at a time, add the scratch file sizes for all the files together. The easiest way to do this is to look at the Info panel for each file. You may have to configure the Info panel to show the scratch size and efficiency.
- Open the maximum number of files you would ever edit at once.
- After opening each file, jot down its scratch file size.
- For each file, perform the series of operations or actions you might typically perform. Err on the side of more operations rather than less.
For step 3, you can instead run the diglloydMedium or diglloydHuge benchmarks—see thediglloyd Actions page.
At the end of step 3, add the new scratch file size(s) from all the file(s), rounding up to the nearest gigabyte (GB). This is your ScratchFileTotal figure. Note that after a lengthy operation it can take 10-20 seconds to show the correct information in the Info panel. Go to step 2.
(scratch file size just after opening the file, and after diglloydMedium test)
Step 2 — calculate the amount of memory required
Extensive testing confirms the formula below is optimal, meaning that more memory won’t make things run any faster. Figures are in gigabytes (GB):
If you run other applications at the same time, they’ll need memory also. The “2” figure is intended to account for that. If you’re running Photoshop by itself (no other programs), then the extra 2GB can be omitted.
Keep in mind that memory should be installed as 4 matched modules at a time or memory performance may be impaired—see All About Mac Pro Memory.
- Example — 3GB scratch
- Scratch file size is 3GB, yielding a recommendation of 5GB. Round this up—you should install 8GB of memory.
- Example — 15.7GB scratch
- Install 16GB of memory; this will work optimally if you are running Photoshop by itself. Go to 24GB or 32GB if you run other significant programs at the same time. If you already have 2GB or 4GB, adding 4X4GB modules should suffice.
- Example — 58GB scratch
- Install 32GB of memory, and still this won’t be enough. When and if it’s possible to install 64GB or 128GB, your work will speed up even more.
Link: http://macperformanceguide.com/OptimizingPhotoshop-Intro.html
Get Access To Photoshop Software
Creative Suite 4
Design Premium
- Acrobat 9 Pro
- Dreamweaver CS4
- Flash CS4 Professional
- Fireworks CS4
- Illustrator CS4
- InDesign CS4
- Photoshop CS4 Extended
Creative Suite 4
Web Premium
- Acrobat 9 Pro
- Contribute CS4
- Dreamweaver CS4
- Flash CS4 Professional
- Fireworks CS4
- Illustrator CS4
- Photoshop CS4 Extended
- Soundbooth CS4
Creative Suite 4
Web Standard
- Contribute CS4
- Dreamweaver CS4
- Flash CS4 Professional
- Fireworks CS4